
❤️ Would you like to save this?
By saving, we'll email this post to you for later. Unsubscribe anytime.
Skip the pumpkin carving kit and still bring a festive touch to your Halloween decor with these fantastic DIY no carve pumpkin ideas. Using real or faux pumpkins transform an ordinary pumpkin into a creative and attractive design that will be fun for the whole family. You can use these pumpkins to decorate your front porch to welcome your trick-or-treaters or use them around your house for decoration.
Below we have gathered together a collection of some of our favorite pumpkin ideas in hopes that they will help inspire you to create one of your own. Don’t forget to save your favorites to Pinterest, you ca re-visit them year after year to create new ideas. Below each of the images are further details and links to the full tutorials. Happy crafting!

1. Diy Metallic Glitter Frosted Pumpkin. Ditch your carving knife and add glitter to your pumpkins this season. This one features faux white pumpkins, glue, and gold glitter. For the glue, try Elmer’s glue, spray adhesive, or Mod Podge. Shake off any glitter that didn’t fully adhere to the pumpkin onto craft paper. (via Yesterdays Sweetheart)

2. DIY White Corset Pumpkin. To re-create this sassy pumpkin you will need a real pumpkin or a carvable faux pumpkin, drywall saw, cutting board and spoon (to clean out the pumpkin), drill with 3/8 drill bit, 8 3/8 in grommets, paint and brush (optional), and ribbon of your choice. To get the complete instructions on how to create this fun pumpkin, click on the provided link. (via Home Stories A to Z)

3. Black and White Glam Pumpkin. A white faux pumpkin is decked out with rhinestone letters to form the letters “Boo!”, sourced from the Recollections brand at Michaels. The pumpkin is topped with a paper mache hat, ribbon, and a feather with glitter picks. Get the full tutorial at the provided link. (via A Pumpkin and a Princess)

4. Decoupage on Pumpkins. To make these simple pumpkins you will need decoupage glue or Mod Podge. Decorate your faux pumpkin with leftover wrapping paper or decorative craft paper or even fabric strips. Create these unique pumpkins to match your fall style and you can switch them up year after year with new materials! (via Carson Downing for Better Homes and Gardens)

5. DIY Black Cat Halloween Pumpkins. Greet your guests with these cool DIY black cats. Cover your faux pumpkins (in various sizes and shapes) with three layers of exterior paint (dry between coats). You will need a 2″ foam paintbrush, a medium-tipped white paint marker for the cat eyes, and a black marker for the pupils. A hot glue gun can be used to affix the ears, nose, and whiskers. Cut out black craft foam for the ears and felt for the noses in light gray, brown, or red. To form the whiskers, used gray and light brown pipe cleaners. (via HGTV)

6. Tinsel Monster Pumpkins. To create this look, you will need a tinsel wig from the Halloween costum aisle. Cut a hole in the top of the wig and place it over the stem of the pumpkin. Use googly eyes or ping pong balls for the eyes. Cover the ping pong balls with cupcake liners. (via Dane Tashima for Better Homes and Gardens)

7. DIY Winking Eye No Carve Pumpkin. This 30-minute DIY idea comes complete with a printable template. To create this, you will need a pumpkin (real or faux), white and black craft paint, paint brushes, black contact paper, scissors and a craft knife. Get the full tutorial and template to make this project from the provided link. (via idlehandsawake)

8. Decoupage Fall Leaves on Pumpkins. Decorate your pumpkins with seasonal fall leaves. Gather leaves from your yard to create these personalized pumpkins. You can also use faux leaves from a craft store or computer print-outs (cut out each of the leaf patterns). To re-create, you will need to paint your pumpkins with chalk paint found at your local craft supply store. Paint a second coat if necessary (after the paint is dry). Apply Mod Podge to the back of each leaf with a medium-sized paintbrush, press down flat and let dry. Continue pressing leaves till you have your desired pattern. Brush a thin layer of Ultra Matte Mod podge, covering the whole pumpkin, and leave to dry. (via Plaid)

9. Dripping Wax No Carve Pumpkin. Create a spooky looking pumpkin by melting crayons on top of them. The entire process will be a fun DIY project to do with your kids! You will need real pumpkins, crayons, tacky glue, a blow dryer and a plastic tarp or large garbage bag. Cut your crowns in half and stick them to your pumpkin with the glue. Let dry. Use the blow dryer to melt them to the pumpkins. Be sure to have your tarp or garbage bag underneath. (via Pottery Barn)

10. DIY Moon and Stars Pumpkins. For this project you will need large and small pumpkins, scissors, a few craft punches (Star Thick Materials Punch by Fiskars), and vinyl. The vinyl is just like a sticker, which will be a fun craft project for kids. If you are using real pumpkins, use matte craft paint by applying with a paint brush before applying the stars. You will need both hologram vinyl and hologram glitter self-adhesive sheets and matte white vinyl for the shapes. Get the full tutorial at the provided link. (via Oh So Beautiful Paper)

11. DIY Flying Letter Painted Pumpkins. To make this simple project, all you need is some paint and vinyl letter stickers to affix to the pumpkins. For the paint, apply about three coats of either acrylic or spray paint to your pumpkins. Affix the vinyl letters randomly to your pumpkins. The larger ones have 1-inch vinyl stickers, while the medium ones have 3/4 inch and the smaller have 1/2 inch stickers. (via The Beauty Dojo)

12. DIY Watercolor Pumpkins. To make this fun and easy to make pumpkins, you will need a trio of plastic craft pumpkins from your local craft supply store. White spray paint, watercolor paints, paper towels, sponges, and sealant. The colors used for this project include Quniacridone Rose, Cerulean Blue, and Purple. Get the step-by-step instructions at the provided link. (via Lines Across)

13. DIY Glow In The Dark Pumpkins. For this project, you will need faux white pumpkins and glow in the dark paint by Tulip. Use various colors and patterns, a fun project for the whole family! For the lines, begin from the top of the pumpkins and draw thin, squiggly lines up and down. Keep adding additional colors to get the desired effect. Get the complete instructions at the provided link. (via I Love To Create)

14. DIY Modern Painted Pumpkins. Perfect for Halloween, these pumpkins would look great outside to greet your trick-or-treaters or you can use them to decorate your interior, creating a spooky ambiance on your mantel or console table. To create these, you will need pumpkins, chalk paint, painter’s tape, stone spray paint, and vinyl letter stickers. Get the full DIY instructions at the provided link. (via The Beauty Dojo)


15. DIY Iridescent Pumpkins. These pumpkins were created using marbling and dipping pumpkins in glitter using both craft and real mini pumpkins. To create, you will need pumpkins in various sizes, craft paint, extra fine hologram glitter, iridescent confetti, iridescent cellophane, tacky glue, Mod Podge or Elmers glue, paint brushes, silver, hologram glitter and iridescent glitter nail polish (drugstore variety), disposable aluminum roaster pans (for the marbling), and wax paper. Get the complete details at the provided link. (via Oh So Beautiful Paper)

16. DIY Trick or Treat Ombre Pumpkin. Create this fun ombre pumpkin that is super trendy this season. To make it more interesting, add a black adhesive vinyl sticker with the words “trick or treat” to greet your guests. The result is a bold pumpkin with a festive text. Get the full DIY how to at the provided link. (via Sarah Hearts)
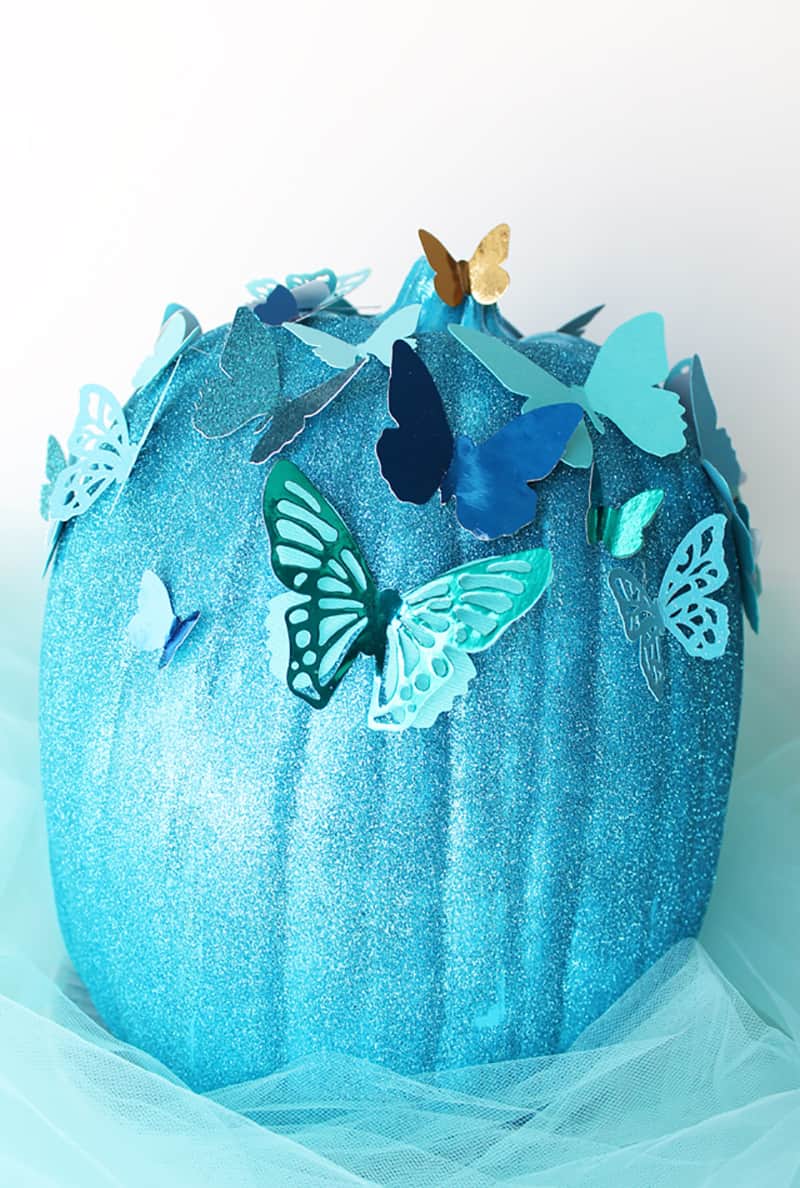
17. DIY Cinderella-Inspired Butterfly Pumpkin. This whimsical no carve pumpkin design is inspired by Cinderella’s stunning light blue ballroom gown that is covered in small butterflies. To re-create, you will need a craft pumpkin from Michaels, rust oleum spray paint in Oasis Blue, Recollections fine glitter in Peacock Blue, Mod Podge, Heidi Swapp Minc 3D Butterflies, assorted yardstick and hot glue. Get the detail tutorial at the provided link. (via My Sister’s Suitcase)

18. DIY Ombre Glitter Pumpkins. Create these charming mini pumpkins in eye-catching colors and covered in glitter for a festive touch. For this project you will need mini pumpkins, liquid glue (Tacky Glue), ombre glitter (can be found at the Dollar Store), Paint Brush, and paper plate or paper to use as a work surface. Be sure to wash your pumpkins with soap before painting on the glue and adding the glitter! Get the full instructions at the provided link. (via Lemon Thistle)

19. Ombre Spiderweb Pumpkins. A modern twist on the traditional spiderweb design, try adding an ombre affect onto a white faux pumpkin. You will need thin painters tape to create your spiderweb design. TIP: You can create this same look without the ombre design with just spray paint in any color you wish. You can also create a stone look on your pumpkin with Stone Spray Paint – American Accents – Rust-Oleum found at your local craft supply store. Get the full instructions at the provided link. (via Plaid Online)

20. DIY Glow-in-the-Dark Pumpkin. For a fun no carve pumpkin project, try making these glow-in-the-dark pumpkins. Once it gets dark on Halloween, these glowing pumpkins will look great on your porch to greet your trick-or-treaters. To make this pumpkin design you will need glow in the dark vinyl, black pumpkins, Cricut cutting machine, transfer tape and a weeding tool. Get step-by-step instructions at the provided link. (via A Pumpkin and A Princess)

21. DIY Animal Pumpkins. Create some charming animal-themed pumpkins this Halloween. Using templates, create a round black cat, a chubby horned owl, or a sly orange fox and embellish them with felt and google eyes. Get more details at the provided link. (via Lia Griffith)

22. DIY Black-and-White Pumpkins. Instead of greeting your trick-or-treaters for Halloween with the traditional jack-lantern, try creating these chic black and white pumpkins. The black pumpkins were created using panty hose! Get the full tutorial at the provided link. (via Oopsey Daisy Blog)

23. DIY Pastel Pumpkins. This project is fun for the whole family to try this Halloween season. Paint fresh pumpkins white, with spooky messages of “Eerie”, “Boo”, “Spook” or other messages you can come up with. Paint the stems in playful pastel hues. Get further instructions at the provided link. (via The Sweetest Digs)


0 comments